Bower Power Inspired Project

Life has been a little crazy recently and thus I’ve been slightly MIA. There are a lot of changes coming in my near future on the job front, the home front, and the friends front. I’ve been preparing for all of them which hasn’t left much time for writing and sharing.

Lets start with the home front…

Since I’m a renter and don’t want to invest more money and time into something I can’t enjoy long term, my plans and projects have drifted to Brian’s house. Thus, the projects I share with you from now on will mostly take place at Brian’s house. His house is kind of a blank slate, tons of opportunity. That also means that sometimes you get lost in all the possibilities and Pinterest does not help at all, so many great ideas. We have been putting together a plan. We still haven’t nailed everything down or have a set timeline yet but we have started on some of those small no-brainer projects. Those small projects that need to get done that we both agree on. So, we’ve been taking care of those and I just haven’t taken the time to sit down and share with you guys. Case in point, I still haven’t finished sharing the microwave install. I’m finishing the final touches, the post will go up next week.

One of the small projects we recently accomplished was inspired by Katie over on Bower Power, her Front Lights Makeover.

Background story…

One of the perks of being a contractor is that you occasionally are able to bring home “leftovers.” Things they ordered too many of, things that were ordered by mistake, things that were messed up while shipping, etc. Brian brought home a set of black decorative outdoor lights one day. They ended up being the perfect size to hang on either side of the garage. In our haste to hang these bad boys I didn’t get a great before picture. This was all I could find…

My Morning Coffee Blog- Brian's Old Exterior Lights

All you can really see is that the old ones were small and brass.

Brian installed the new ones…

My Morning Coffee- New Exterior Lights

They look great! From my research we saved roughly $80 by not having to purchase them. Dolla dolla bills yo!

If you notice in the really old picture, the lights by the front door were a matching brass along with the numbers on the house (seriously, I know you can’t see the numbers, but believe me, they were brass.)

Here is where the inspiration came in…

Katie over on Bower Power shared how she painted her outdoor lights and they looked great. Instead of purchasing new lights for the front door, why not paint them? Worse case scenario, we spend $5 on paint, we hate it, and then we buy new lights. Only $5 wasted with the potential to save roughly $60. So Brian and I got to work.

Katie didn’t remove her outdoor lights for painting because she has stone behind her lights and she didn’t want to risk taking them down and creating instabilities with remounting. Due to the fact that our lights are smaller and on siding we decided to take ours down to paint them. Make sure to turn the power off to your lights before removing them.

My Morning Coffee- Pre-painting Outdoor Lights

Yea, these were looking pretty bad, needed some TLC.

Using painters tape I taped over all the glass. The curved edges were a little tricky. In order to get crisp edges I used an X-acto knife in some locations.

My Morning Coffee- Painter's Tape on My Lights for Easy Painting

When we unscrewed and removed the top of the fixture our lights set up perfectly when turned upside down. This meant that I didn’t have to tape the inside of the glass for the first phase of painting.

Here is Brian in action for phase I..

My Morning Coffee Blow- Exterior Lights Makeover

You might notice that we took the brass numbers off the house and gave them a little makeover too!

You can also see how I taped completely over the back of the light where the wires are, I didn’t want to risk paint messing anything up. When doing this make sure that you notice where your screw holes are. They all need to be covered so paint doesn’t get through the front or back side of the wire casing. Also, don’t forget to paint the heads of your screws/caps as well because they will be showing when you re-install your light. There are two choices on this front: 1. paint the screws when you paint the light, apply lightly being careful not to get too much paint on the head and hardly any on the threads because that will make your re-install a little more difficult if not impossible; 2. you can always touch them up after you remount the lights with some spray paint on finger or paper towel action. Our screws were more like caps with internal threads, so we set them out on the cloth next to our lights and sprayed them at the same time. We ended up using option number 2 at the end to do some touch up.

We went with plain black Rust-Oleum or “canyon black” to match our “leftover” lights by the garage.

My Morning Coffee Blow- Exterior Lights Makeover

After the first coat was done drying we flipped over the lights and using more painter’s tape we covered the hole on the top. I don’t have any shots of this particular step, sorry. I essentially created a sheet of tape slightly larger than the hole. I stuck the sheet through the hole with the sticky side up and then with some  finagling got it to stick around the rim of the hole. Very scientific. Phase II of painting was just painting the top of the main fixture section that was touching the ground in phase I.

Once that paint was dry we were ready to re-install. In the end it took one coat of paint just in two phases to make sure everything was covered (2 coats on the numbers). I promise next time to take more progress photos, my head wasn’t on strait that day.

Here they are re-installed…

My Morning Coffee Blow- Exterior Lights Makeover

Mounting the lights was just as simple as reconnecting the wires, screwing the base into the wall, and then screwing the top of the fixture back on. Nothing difficult.

There is a whole panel that is brass instead of glass on the inside. You can see it in the picture above on the house side of the fixture. We didn’t paint the brass on the inside because we felt like the gold inside wouldn’t be that noticeable. With the house being cream it just blends in to us. If that panel were black it might look a little odd. You agree?

How it all came together…

My Morning Coffee Blow- Exterior Lights Makeover

My Morning Coffee Blow- Exterior Lights Makeover

Yes, it was snowing when I took these pictures, so, pardon the little white flecks.

When we removed the house numbers we realized that the painters didn’t paint behind them. This meant we had to re-install them in the same locations even though that meant that the garage light overlapped them a bit. A problem for another day…

My Morning Coffee Blow- Exterior Lights Makeover

Here are some shots at night.. (Beware, I haven’t mastered our camera’s settings for night time yet.)

My Morning Coffee Blog- Exterior Lights Makeover

My Morning Coffee Blog- Exterior Lights Makeover

My Morning Coffee Blog- Exterior Lights Makeover

My Morning Coffee Blog- Exterior Lights Makeover

All and all, I count this project as a success. Thanks Katie for the inspiration and money saved.

Next time I’ll do better with before shots. That way I can have an amazing before and after shot showdown because this just doesn’t do it for me….

Before…

My Morning Coffee Blog- Exterior Lights Makeover

After…

My Morning Coffee Blog- Exterior Lights Makeover

#beforeandafterfailure #15yeargap

Installing Microwave, Part 1

I know.. #slacker… but let’s get  back to work.

1. My back is rather sore because I just spent the last two episodes of Emily Owen practicing great posture on the couch. Working hard on my New Year’s goal. So, if you’d like, imagine me hunched over my computer whilst typing extra slouchy to give my muscles a break.

2. I’m finally going to share with you Brian and I’s microwave installation.

To help everyone, whether you’re a new reader, or a reader that doesn’t remember us purchasing a microwave because it has been forever since I talked about it, let me remind you of the high points. Brian and I have been putting together a list of improvements we want to make on his house. One thing on the list was to update the kitchen. Part of the update was installing an over the range microwave in order to clear up some counter space. This microwave needed to be stainless steel because Brian over the past year has replaced all of his other kitchen appliances with stainless steel ones. We hadn’t made all of the decisions regarding the kitchen update nor had (have) we saved enough money to start. But… while shopping at Lowe’s I came across a great deal on an over the range microwave that was in a display there. Enter microwave for $233.

My Morning Coffee- $219 for New Microwave

This deal was too good to pass up and even though we hadn’t settled on our final plans, we knew an over the range microwave was going to be part of it. So, as you can see above, it was purchased and loaded into my car.

Now we are back to current blog time. Notice, I said blog time, because at present time the microwave has been installed for almost a month and I’ve been a #slacker.

Because the microwave was a display unit and really discounted it was missing a few things: 1. the mounting bracket that goes on the wall, 2. the screws that are used to secure it to the cabinets above, and 3. the filter for the fan. In order to mount the microwave we first had to procure items 1 and 2.

The bracket we found at Part Select. It was pretty easy, all we needed to know was our make: KitchenAid and our model #: KHMC1857.

My Morning Coffee- Bracket from Part Select

Yep it was that cheap. Shipping was $7.49, so our grand total was $13.99.

The screws were really just guessing and checking using Brian’s contractor knowledge. In the end we ended up using (2) #10 screws that were 3″ long.

Item #3 we’ll get to in Part 2.

For a typical project the draw back to having to order a part online is the waiting. You get all pumped up to work on a project, just to wait. This project is a little different because there was a lot of prep work involved prior to installing the microwave.

Here is the before picture…

My Morning Coffee- Before Microwave Install Picture

Notice the amount of counter space the microwave was taking up. Also notice how low the exhaust hood is. Not low for it’s function, just low when you plan to replace it with a big microwave. “A lot” of prep work  entailed moving the cabinet. Instead of replacing the center cabinet with a shorter one we decided to  move the cabinet up, making the top of the cabinet appear to be stepped. Based on all of our calculations the space above the cabinet was adequate thanks to the high ceilings.

First make sure to turn power off to the existing exhaust hood. Most hoods are hard-wired, so turning the power off, is a must.

My Morning Coffee- Turn Power Off before Removing Exhaust Hood

Make sure to cover your stove. There is definitely potential for scratching if you have a flat top like we do. Do not let this covering trick you into thinking you can apply weight to the stove. Believe me, we almost stepped on it a few times when moving the cabinet.

My Morning Coffee- Make sure to cover your stove before starting.

There are wires running from the fan that connect with the wires coming out of the wall (hard-wired). We disconnected these and removed the screws holding the fan in place.

My Morning Coffee- Removing Exhaust Fan

We then removed the fan and ran into our first surprise…

My Morning Coffee- First Problem

Here is a close up…

My Morning Coffee- Issue #1 Close Up

When I first looked at this I thought there were two problems: 1. there is a big hole in the wall and 2. there has been some kind of electrical fire. Brian set me straight on both fronts.

1. He said this type of hole is typical. When constructing a new house the electricians and drywall guys come in prior to the installation of cabinets and appliances. The electricians make their best guess about where the wire needs to come out of the wall, and the drywall guys do their work around it. When the cabinet and appliance guys come in they just rip the wire across the drywall to where they need it. They don’t worry about patching or anything because it will all be covered up.

2. This is no electrical fire. Under careful inspection Brian decided we had a mold issue. It appears when they moved the wire or when they installed the hood something cut through the vapor barrier or the plastic covering the insulation. Because the plastic was punctured, moisture accumulated. This was worsened by the fact that it was over the stove.

We couldn’t do anything about any of this until we removed the cabinet above in order to see the extent of the damage. Each cabinet is secured to both the wall and the cabinets directly beside it. Make sure you find all of these connections and remove all of the screws.
If you miss one you risk ripping it out due to the weight of the cabinet. Our cabinet also had a trim piece that went across the top. We removed this carefully in order to salvage it for later.

My Morning Coffee- Cabinet Connection to Wall

My Morning Coffee- Cabinet Connection to Adjacent Cabinet

I don’t have any pictures of us standing awkwardly on the counter removing this cabinet because we haven’t trained Bauer to use a camera yet. It is on our to-do list.

The mold issue was confirmed once we removed the cabinet.

My Morning Coffee- Mold Issue

There was also mold on the cabinet we removed.

My Morning Coffee- Mold On Cabinet

We stopped where we were and went to the local Ace Hardware to buy some bleach.

To be continued…

Local Craigslist Finds

I mentioned on Tuesday that I would be filling you all in on the microwave install and cabinet moving deets. I wasn’t able to accomplish this because Brian and I ran into some complications. They have all been solved so I’ll be able to give you the full run down next week. Here is a little  iPhone teaser…

My Morning Coffee- Microwave Install Teaser

Since I’m not able to bring you DIY instructions today I thought I would hook you up with some local Craigslist finds…

Faux Bamboo Dresser for $495 (Not a great price, but it would look killer painted!)

My Morning Coffee- Faux Bomboo Dresser from Craigslist

Faux Bamboo Bar Cart for $195 (This was listed by Triangle Honeymoon! If only I had the perfect place to put it!)

My Morning Coffee- Faux Bamboo Bar Cart on Craigslist

Bamboo Table for $60 (Am I the only one that likes this? Again, would be awesome with some paint!)

My Morning Coffee- Bamboo Table on Craigslist

To move out of the bamboo trend… Danish Modern Credenza and Hutch, $650 for the pair.. not too shabby.

My Morning Coffee- Danish Modern Pair on Craigslist

I found this next beauty last week. I didn’t share because I was hoping it would be my new jewelry box. I decided I can’t splurge right now but I hope one of you can! All it needs is a little TLC. Check out the brass accents! $95. You couldn’t build it for cheaper.

My Morning Coffee- Jewelry Box on Craigslist

I love old sideboards. You could snag this painted one for only $150 or go all natural for $250 (you’d still have the option to paint and customize later).

My Morning Coffee- Painted Sideboard

My Morning Coffee- Sideboard on Craigslist

I like these basket weave lamps. You could clean them or paint them. Only $30 OBO. Great deal if they are solid, not so great if they are plastic.

My Morning Coffee- Basket Weave Lamps

If I had a bigger office or a garage right now I would be buying these… $75 for the pair OBO.

My Morning Coffee- Two Card File Boxes on Craigslist

Hope you all have a great Thursday! I’ll see you tomorrow for some Friday Favorites.

How to Improvise

I’ve mentioned before that Brian and I are trying to save a little money over the holidays.

Enter fake Christmas tree…

The tree that Brian has was actually the tree he celebrated with growing up so it has seen many-a-Christmas’. It has been loved and adorn.

Enter Mary Beth…

After Brian brought the tree down from the attic and assembled it, I began to spruce up the limbs and make it look pretty. I was going about my business when, crack, I broke the Christmas tree. Well, not exactly the tree, just the stand. Brian handled the situation like a champ, even though he saw his childhood tree dying, or so he thought.

My Morning Coffee- Broken Christmas Tree Stand

Enter Christmas improv…

I was feeling pretty guilty and knew there had to be a way to fix it. The tree was still fully functional, it just needed a stand. We still had my dad’s Christmas tree stand from last year when we borrowed it for our live tree. We also had plenty of scrap pieces of wood in the garage, one of the perks of being in love with a contractor. How did we merge those three together, you ask?

Let me go ahead and brush my shoulder off now, it was my idea. Brian did the hard labor though, not because I can’t handle power tools, I just needed to take the iPhone pics so we could share these deets. (By the way, I think Brian wasn’t as sad about the broken tree once I told him this would be a great blog post, made my heart flutter, he is so supportive!)

A 4×4 is essentially like a live tree, just square, but it can still be tightened into a tree stand. So we cinched it in and figured out how tall it needed to be in order to fit perfectly into our live Christmas tree stand. Marked it, and cut it to length. Thank you miter saw.

My Morning Coffee Blog- Miter Saw Cut

The bottom of the fake tree has essentially a peg on it that fits into the fake tree stand, kind of like if it were a socket. So our 4×4 needed to also function like a socket. So we found the right size drill bit for the hole in the tree stand and measured the length required.

My Morning Coffee- The Right Drill Bit Size

Then we marked the center of our cut to length 4×4…

My Morning Coffee Blog- Center of Our 4x4

and drilled our hole.

My Morning Coffee Blog- Drilling Our Hole

Then we fit the 4×4 onto the bottom of the fake tree. It fit perfectly, nice and snug.

My Morning Coffee- 4x4 Fit Perfectly on the Fake Tree

This whole time Bauer was waiting…. (It is his first Christmas and under that sad irresistible puppy dog face he is super stoked, I know it!)

My Morning Coffee- Bauer Waiting For His Tree

So, did it work?

My Morning Coffee- Fake Tree Improvise

Do you know us? It definitely work. It is definitely more sturdy that the original plastic stand. All of the ugliness of this fix will be covered by the tree skirt, don’t you worry. The draw back is that the tree is a little bit higher than before. The positive side to that is more space for big Christmas presents and less stuff close to the ground for Bauer to chew on and knock off.

Christmas can continue, we saved the tree!

You guys run into any Christmas improvisation yet?

Project #2: Gallery Wall

Part of Project #2: Entertainment Ready was a gallery wall. Since the soiree was two weeks ago, the gallery wall has been up a while, but I’m here to share the behind the scene details. I’m sorry for the delay. Lets get started..

Before (the plan was for it to turn the corner):

My Morning Coffee- Potential Collage Wall

After (as you can see, I ran out of items to hang before the corner was turned):

My Morning Coffee- Gallery Wall

It will be turning the corner eventually, I just need to start collecting more!

Sources..

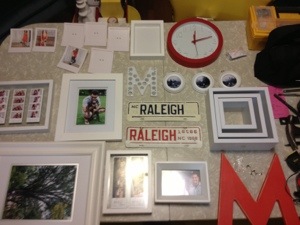
The majority of the frames came from Michaels. Each time I went into Michaels they were having 40% off sales, or buy one get one for a penny, or I had a coupon. You can get 40% off one item in the paper usually. If you are a cheapskate like me, you don’t get the paper, and so you just get a coupon online. There are always coupons on the Weekly Ad online. So I made a few trips in order to get them all on the cheap.

There are two exceptions to the frame rule, one being the Polaroid style frames on the bottom:

My Morning Coffee- Photojojo Frames

I was inspired by Carmel on Our Fifth House:

My Morning Coffee- Our Fifth House Instagram Pictures

Found them on Photojojo. I’m not completely in love. My reservations are due to: 1. Am I the only one that wasn’t sure if they were plastic? I was hoping for ceramic. Photojojo you should make this more clear. 2. The 3.5″x3.5″ is not a standard print size for places like Printstagram so I printed them myself. 3. The frames aren’t 100% secure, they are a little precarious on the wall. 4. This might be due to the fact that the tacks provided aren’t made for 1948 plaster walls. I had to hammer in the tacks which probably deformed the heads a bit. Here is how these little guys attach to the wall:

My Morning Coffee- Photojojo Frame Attachement

So the tack head shape is important to say the least.

The second exception to the rule are the three little circular frames. Let me tell you their story..

My Morning Coffee- Small Frame's Story Take 1

My Morning Coffee- Small Frame's Story Take 2

My Morning Coffee- Small Frame's Story Take 3

My Morning Coffee- Small Frame's Story Take 4

My Morning Coffee- Small Frame's Story Take 5

The two ‘M’s were purchased on Etsy a while back. I had them hanging in my old house. The large wooden red ‘M’ was purchased from EdiesLab. She has some awesome stuff in her shop, definitely check it out. The vintage ‘M’ reflector was purchased from surlymermaid.

The ‘Raleigh’ license plates were purchased from an Estate Sale  a year or so ago. Got a whole stack for $4.

The clock and the wood display boxes are the last two items. These guys were purchased from Target. They don’t seem to sell the red bordered clock online, but here is the all white version. Here are the cube shelves in white. The cubes come with the hardware and everything, highly recommend them.

I guess I didn’t mention the contents of the display boxes. The wood shoe form is not permanent, it is for sale at The Union Jill. The cow salt and pepper shakes, the small brass bowl, and the vintage pedometer are all things that I had lying around collecting dust.

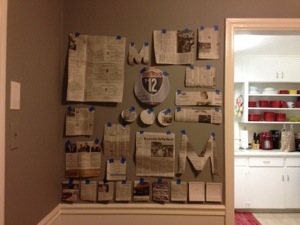
Now that I’ve shared where I collected all the items let me show you how they all managed to be hung on the wall. I utilized more newspaper:

My Morning Coffee- Newspaper Technique

I traced each item on top of the newspaper. I actually marked on the paper where the screw/nail/or hanger needed to be placed. So once I had them all arranged the way I wanted I could actually install my attachment device right through the paper. It worked perfectly. Where an item needed more than one anchor I measured the distance up from the chair railing to ensure they were level because I wasn’t thinking about that at all when I was taping everything on the wall.

And there you have it.. sources, instructions, and before and after pictures. What more could you ask for?

As a last little plug, thanks again Stephanie Egan for giving us all of these gorgeous photos.

I’ll leave you with a few close-ups…

My Morning Coffee- Gallery Wall Close-Up 1

My Morning Coffee- Gallery Wall Close-Up 2

My Morning Coffee- Gallery Wall Close-Up 3

Shirley is staying!

The plastic came off… Shirley is staying!

My Morning Coffee- Shirley is staying!

Don’t you love her? For those of you new to the scene. I vowed way back when that I would stalk this lamp. Then I purchased it a few weeks ago, but wasn’t completely sold, due to the price tag. But now… she’s mine! I knew it was meant to be once I started feeling like it was already part of my decor, taking off the plastic just made it official. Adopted forever!

In other news… there are a few new items in the store you should go check out..

A Pair of Mirror Trays

My Morning Coffee Blog- Pair of Mirror Trays from The Union Jill

Red and Gold Asian Inspired Tumblers… There are 8 total available..

My Morning Coffee- Red and Gold Asian Inspired Tumblers from The Union Jill

Wood Shoe Form.. Awesome home decor item!

My Morning Coffee- Wood Shoe Form from The Union Jill

My personal favorite, a Green and Pink Chinoiserie Vase

My Morning Coffee- Chinoiserie Vase from the Union Jill

Happy Tuesday!

DIY Pom Pom Trimmed Curtains

Is anyone else guilty of being a “yes” person? I love making plans, having things to do and be a part of. So when people talk about doing things or making plans, I always say “yes.” I definitely think this is a good quality, don’t get my wrong. I have a tendency to take it to an extreme sometimes though, right now being one of those instances. Every night during the week seems to be booked and every weekend through the end of the year. Believe me, I want to be a part of all of the plans I’ve made, but that means that something else has to be sacrificed. Since I have to pay my bills there can be no sacrifices from 8-5. I have to spend time with my loving boyfriend and best furry friend, Bauer. So, that means lately the blog, the Etsy store, and my sleep have been getting the short end of the stick. The three things that I enjoy doing so much have been pushed to the back burner. I know I seem like a broken record, but I’m sorry to all three of you. Please forgive me and be patient while I work on becoming a “yes every other day” person. Thanks, MB

Now that I have publically apologized… DIY Pom Pom Trimmed Curtains..

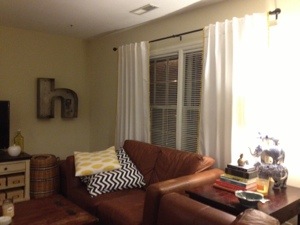
When I moved into my current house this past June I was greeted by my first curtain rod. I’ve never been a curtain person but I decided to change my ways and add curtains to my home wish list because the curtain rod was screaming, “you don’t have curtains and I’m telling everyone.”

Whilst reading blogs I found my inspiration and added curtains to the Project #2: Entertainment Ready list.

Inspiration: Triangle Honeymoon, Anthropologie, Martha Stewart, and The Little Black Door.

My Morning Coffee- Pom Pom curtain Inspiration from Triangle Honeymoon  My Morning Coffee- Anthropologie Pom Pom Curtains  My Morning Coffee- Martha Stewart Pom Pom Curtains  My Morning Coffee- Pom Pom Inspiration from The Little Black Door Curtains

Since I was in a time crunch I decided my plan of attack would be to buy simple plain white curtains and add pom pom trim. As I shared last week I went with these beauties from West Elm

My Morning Coffee- West Elm Curtains

and these pom poms from frogfeathers.

My Morning Coffee- Golden Pom Poms from frogfeathers

Then the most difficult part, the logistics of getting the pom pom trim onto the curtain. There are essentially three options: 1. iron on tape, 2. sewing machine, and 3. hand tack/sew the trim. Note that I eliminated the fabric type glues because, well, I’m not going to love gold pom poms forever, let’s be honest.

I’ve never really been a fan of the iron on tape, it always seems to fail on me, so we are down to two options. You can’t really tell from the picture but the border on the trim is only about 1/4″ wide. That combined with the squirminess of these little boogers made the sewing machine nearly impossible. So hand tack/sew was all I had left.

I thought I was just going to tack the trim on in a few places but that quickly turned into hand stitching almost the whole thing. So essentially, my saved time by not making curtains was cancelled out by my lost time hand stitching on trim. You win some, you lose some.

In the action shot below you can see that I stitched the border of the pom pom trim as close to the edge of the curtain as I could get.

My Morning Coffee- Pom Pom Curtain Action Shot

Being the planner that I am, when I was done (forever later) I only had this left…

My Morning Coffee- Leftovers from Pom Pom Curtains

CRAZY!

Upon completion I was tasked with ironing… the largest 2 items I’ve ever ironed. I wasn’t sure how to accomplish this… so..

My Morning Coffee- Ironing Pom Pom Curtains

Is this how other people do this? Can’t be.

Then… bam.. New curtains!

My Morning Coffee- New Pom Pom Curtains

Don’t mind the plastic on Shirley, I’m still not sure.

Close up..

My Morning Coffee- Close Up of Pom Pom Curtains

You can see that I continued the trim all the way to the top of the curtain. Make sure not to sew up the hole for the rod by accident! I should have taken a picture of the bottom of the curtain, I sewed the trim all the way around, like a horse shoe.

So, I’m officially in love! You guys like? Did I do a good job?

Friday Favorites / 10

I finished 99.9% of Project #2 before the soiree last night (thanks to all that came!). 4 out of the 5 items were completely finished. The gallery wall was lacking a bit. I posted an instagram photo of what was accomplished before the deadline.

I still need to fill a few frames and a few spaces.

When I shared with you guys that I know my personality and I know that I would get more done if I set myself a deadline and let you guys hold me accountable, I forgot to mention that I am a full blown procrastinator. I always end up getting things done and meeting deadlines but it always comes down to the last minute. AKA… my hanging the gallery wall yesterday during lunch. I should have known that this part of my personality would result in less blogging. I should have planned accordingly and started this particular project earlier. Again, another lesson learned. I have plenty of progress photos though, so I will be sharing them with you and the diy instructions next week. Thanks for sticking with me as I find my blogging flow.

Down to business… I still wanted to share with you guys some things I came across this week.. Without further ado.. Friday Favorites!

My Morning Coffee-Friday Favorites / 10

  1. Colossal Gold Wishbone from Anthropologie
  2. Tackety Pitcher, Round from BHLDN
  3. Open Bloom Top from Anthropologie
  4. Goodly Whale Bottle Opener from BHLDN
  5. Vintage Blue and White Ceramic Ginger Jar from EstateEclectic on Etsy
  6. Christmas Knit Pattern Wrapping Paper from NormansPrintery on Etsy
  7. Milk Glass Vase Collection: Beeswax Candles from freshpastrystand on Etsy
  8. Womens Ambrogia from UGG Australia
  9. postcard wood- one deer card from formesberlin on Etsy

Hope you all have a great weekend. Anyone doing anything special?

Project #2: Not Complete

Project #2 was not completed last night. I had a deadline at work which caused me to work late a few days which translated to less time to finish my project. I hope to finish at lunch and before the gathering. It won’t be the end of the world if it doesn’t get done though, I set this deadline for myself.

I’m on the road currently for work, so this is a rushed iPhone post. I promise to share more details about project #2 once everything is finished.

Progress photos as of when I hit the hay last night:

20121129-092358.jpg

20121129-092440.jpg

20121129-092510.jpg

20121129-092525.jpg

Project #2: Raleigh Print

If you haven’t been reading in a few days and need refresher course on Project #2, read this post.

Last night I wasn’t able to finish my pom pom trimmed curtains as planned so I’ll be updating you on those tomorrow, sorry for the delay.

I wasn’t able to finish them because I had to package and ship some Etsy orders. We’ve sold 4 items in the past two days. Definitely a good reason to not sew curtains!

Here are the recently sold items:


Make sure to check out The Union Jill. Our store is running a little low on items right now, but we have plenty we will be posting soon, so check back.

Teaser, including a few items yet to be posted..

Back to project related news… The Raleigh print came in and it has already been hung…

I bought a shadow type frame, so the print appears to  be floating (from AC Moore). You can see it a little better in this shot…

You can pick up your own print from amycnelson on Etsy. She has plenty of other cities available too.

Hopefully tomorrow I’ll have the big pom pom curtain reveal. I’m going to try my hardest.